
Professional tools for organizers who run events at scale — QR entry verification at the door, interactive floor plans, custom registration forms, attendee data export, and availability analysis. These features are available on Club and Business premium tiers.
QR Entry Verification (Business Tier)
Check people in at the door by scanning a QR code. Ludoya confirms they're on the list and marks them as having shown up, so your attendance record builds itself as people arrive — no clipboard, no reconciling afterwards.
Re-scanning the same code is harmless: the app says "Already checked in" rather than double-counting.
Two things to set up before the doors open:
- Turn on QR attendance for the event. It's off by default — enable Verify attendance with QR code in the event's settings. The option is only available on events hosted by a group, not personal ones.
- Put the mobile app on the door device. Scanning uses the camera, which the web app can't reach. Attendees don't need the app — their QR code displays fine in a browser.
Anyone who didn't turn up can still be marked with Mark as no-show on the attendee list afterwards.
How It Works
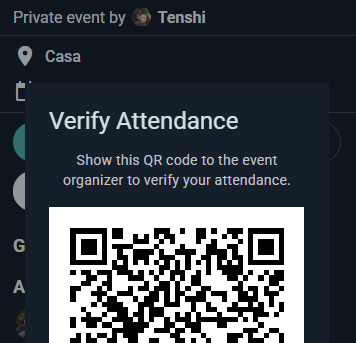
- Attendees open the event page in the Ludoya app and tap the RSVP button
- The RSVP button reveals a drop-down menu with options to change their RSVP, leave the event, edit their own attendance schedule, and show their QR code when asked
- The unique QR code is generated on demand in the app when the attendee picks "Show QR" — no emails, no printing, no pre-issued codes to keep track of
- At the door, scan the code — Ludoya checks it against the RSVP list and shows whether the person is allowed in
QR Codes
- Each attendee's code is unique to the specific event and generated on demand in the app
- Shown directly from the RSVP button's drop-down menu on the event page
- Scanning is instant — works with any phone camera
Benefits
- Fast, frictionless door checks without clipboards or paper lists
- Instant RSVP verification — is this person allowed in or not?
- No pre-issued codes to lose, forward, or reprint
- Prevents non-RSVP'd arrivals from slipping in
Named Spots (Organizations)
Define named spots within your venue and assign events and scheduled games to them.
Locations and Spots
Locations (your venue, or any physical place the organization uses) can contain named spots that map to the real-world areas inside them:
- A café might have a spot for each table ("Table 1", "Table 2", "Window Booth")
- A convention hall might break down into rooms ("Main Hall", "RPG Room", "Demo Area")
- A multi-floor venue might label spots by floor ("Upstairs — Table A", "Downstairs — Back Room")
Setting Up Spots
- Go to your organization settings and pick the location to configure
- Create and name the spots for that location (e.g., "Table 1", "Back Room", "Main Hall")
Using Spots in Events
Any event at that location can claim spots — and it can claim several at once, not just one. A club night taking over the back room and two front tables picks all three.
How it usually plays out:
- A whole-venue event (a convention, a club night taking the place over) often skips spots entirely and just sits at the location. That's fine — spots are optional.
- Sub-events pick the rooms or areas their track occupies, so attendees know where to go: "Beginner track → Main Hall", "Advanced track → Back Room".
- Scheduled games pick the table they're played on.
One rule worth knowing: once a parent event has claimed spots, its children stop offering the spot picker — the parent's choice already describes where everything is happening. Leave the parent without spots if you want each sub-event and table to pin itself.
Attendees then see exactly where their track or table is, and two things running at once can't end up claiming the same table.
Interactive Venue Floor Plans (Business Tier)
Add a visual map layer on top of your named spots. Upload a floor plan image and place each spot on it — attendees explore your venue on a pannable, zoomable map with every table, room, or play area marked.
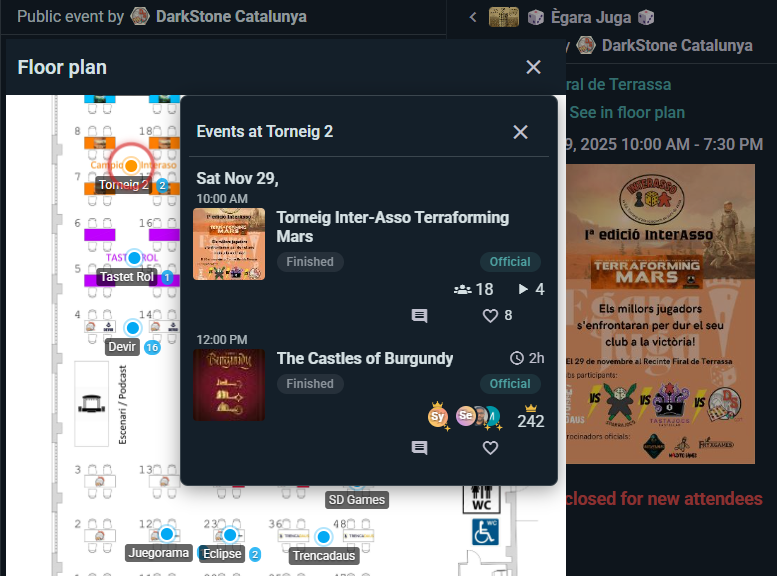
Setting Up a Floor Plan
- In your organization's location settings, enable the floor plan for a location that already has spots
- Upload a floor plan image (a photo, diagram, or architectural drawing)
- Click any spot to drag it onto the right area of the image
Without a floor plan, spots still work as plain text labels ("you're at Table 3"). The visual floor plan shines at larger venues where navigation matters.
Best For
- Large venues with multiple rooms or zones
- Conventions with dozens of tables
- Game cafés where regulars want to pick their favorite spot
- Any venue where "Where is my game?" is a common question
Custom Attendance Forms (Business Tier)
Ask attendees questions when they RSVP — collect information you need to run a better event, all without leaving Ludoya for an external form builder.
Creating Custom Questions
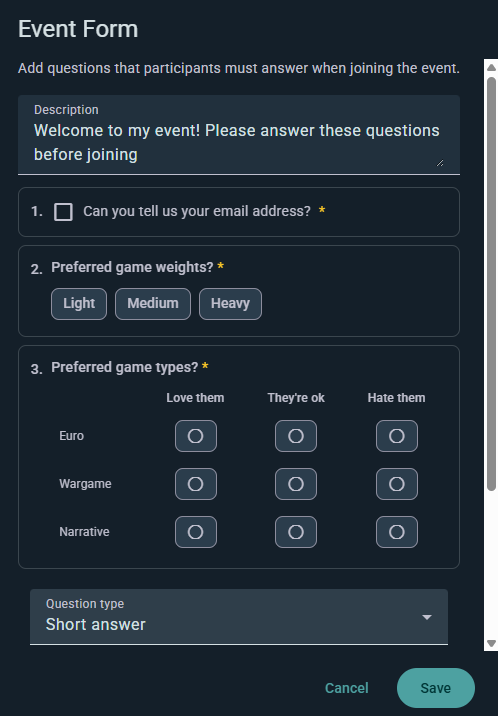
- Open the event's settings and pick the Form section
- Add your questions, dragging them into the order you want (or duplicating one you've already set up)
- Mark any question required
- Save — the questions appear when people sign up
Note the event must belong to a group, and adding a form turns off anonymous guests: if you're asking questions, Ludoya needs to know who's answering.
Question Types
- Short answer — a line of free text
- Paragraph — a longer written answer
- Single choice — pick one from a list
- Multiple choice — pick as many as apply
- Linear scale — rate on a range, with labels at each end
- Multiple choice grid — several questions sharing one set of answers, in rows and columns
- Personal information — ask for an email, phone number, date of birth or gender, validated properly instead of collected as free text
Example questions:
- "Do you have any dietary restrictions?"
- "How familiar are you with heavy euro games?"
- "Do you need a lift?"
- "First time attending?"
Ask Per Guest
Any short-answer, choice or personal-information question can be marked Ask per guest. It's then answered separately for every extra person an attendee brings — reserved friends and named guests alike — with the attendee filling it in on their behalf, and required ones blocking the booking until they're done. That's how you collect four sets of dietary requirements from one person booking a table of four.
Attendee Experience
People answer as they sign up, and required questions must be filled in before they can confirm. Answers are saved with their registration, visible in attendee management, and exported alongside the attendee list.
Use Cases
- Catered events — dietary needs and allergies
- Beginner nights — gauge experience to balance tables
- Corporate events — collect department or team info
- Themed nights — costume preferences, team assignments
Attendee Data Export (Business Tier)
Download RSVP lists, post-event attendance marks, and form responses as CSV.
What You Can Export
One row per attendee, with these columns:
- name and username
- attendance — their RSVP status
- guests — how many anonymous guests they're bringing
- one column per question on your custom registration form, with their answers
Two things worth knowing if you build a spreadsheet around this:
- A question only gets a column if at least one person answered it. Columns come from the answers actually given, not from the form definition, so an optional question nobody filled in simply won't appear — and a column can come and go between exports as answers arrive.
- Multiple-choice answers arrive in one cell, separated by a
|, so "Vegetarian|No nuts" is a single field rather than two columns.
Check-in and no-show marks aren't in the export — the CSV reflects who signed up and what they told you, not who walked through the door.
Use Cases
- Post-event analysis (attendance patterns, popular games, demographics)
- Email follow-ups or loyalty program tracking
- Reporting to venue management or event sponsors
- Planning future events based on past attendance data
Availability Heatmap (Club Tier)
A per-event heatmap that shows when attendees will actually be present during the event, so organizers can plan scheduled games around the times when most people are there.
How Attendees Contribute
When joining an event, each attendee marks which time slots within the event's own schedule they'll be there. For a weekend convention running Friday evening through Sunday, one attendee might say "Friday 18:00–22:00 and Saturday all day", another might only be able to come Saturday afternoon. The RSVP button's drop-down menu lets them edit this personal attendance schedule at any time.
What It Shows
- A visual density strip laid out along the event's own schedule (not weeks or months)
- Peaks where most attendees will be present
- Valleys where few attendees can make it
- Updates live as attendees adjust their availability
How Organizers Use It
- Open the event's attendee list
- Tap View schedules
- Read the Availability Overview density strip for the slots where most people will be around
- Put your most important scheduled games, talks or tournaments in those peaks so the biggest audience can attend
- Below it, Individual Schedules lists every attendee by name with their own slot-by-slot bars — useful when you need to line up specific people, like a demonstrator for a heavy game or the players for a pre-arranged table
Who Can See What
Both sections appear together in the same dialog: the aggregate strip and the named individual schedules. On an event whose host group has the Club plan, anyone who can open the attendee list can see them — not just organizers.
Tell your attendees that, since the times they mark are visible to the rest of the event by name. If that's not what you want for a particular event, don't ask people to fill in a personal schedule.